
Why Your Feet Are Weak (And What to Do About It)
Maintaining strong and stable feet, ankles, and toes builds a dependable base to support your whole body.

If you have flat feet or fallen arches, you're among the nearly 30% of adults who experience this common condition. Flat feet can lead to heel pain, ankle instability, plantar fasciitis, and even back problems.
Here's what most people don't know: While specific flat feet exercises and plantar fasciitis exercises can strengthen supporting muscles and provide temporary heel pain relief, they're only addressing part of the problem. The real issue isn't just weak feet—it's a broken neurological connection between your brain and your arches.
In this post, we'll explore the most effective exercises for flat feet AND reveal why even the best foot support exercises often fall short of providing lasting flat feet pain relief. You'll discover the hidden neurological network that actually controls your arches, plus a simple 5-minute protocol that retrains this system from the ground up.
By the end of this post, you'll understand why traditional approaches have limitations and how to address the root cause that keeps your arches collapsing—all before most people finish their morning coffee.
The Hidden Neurological Network That Controls Your Arches
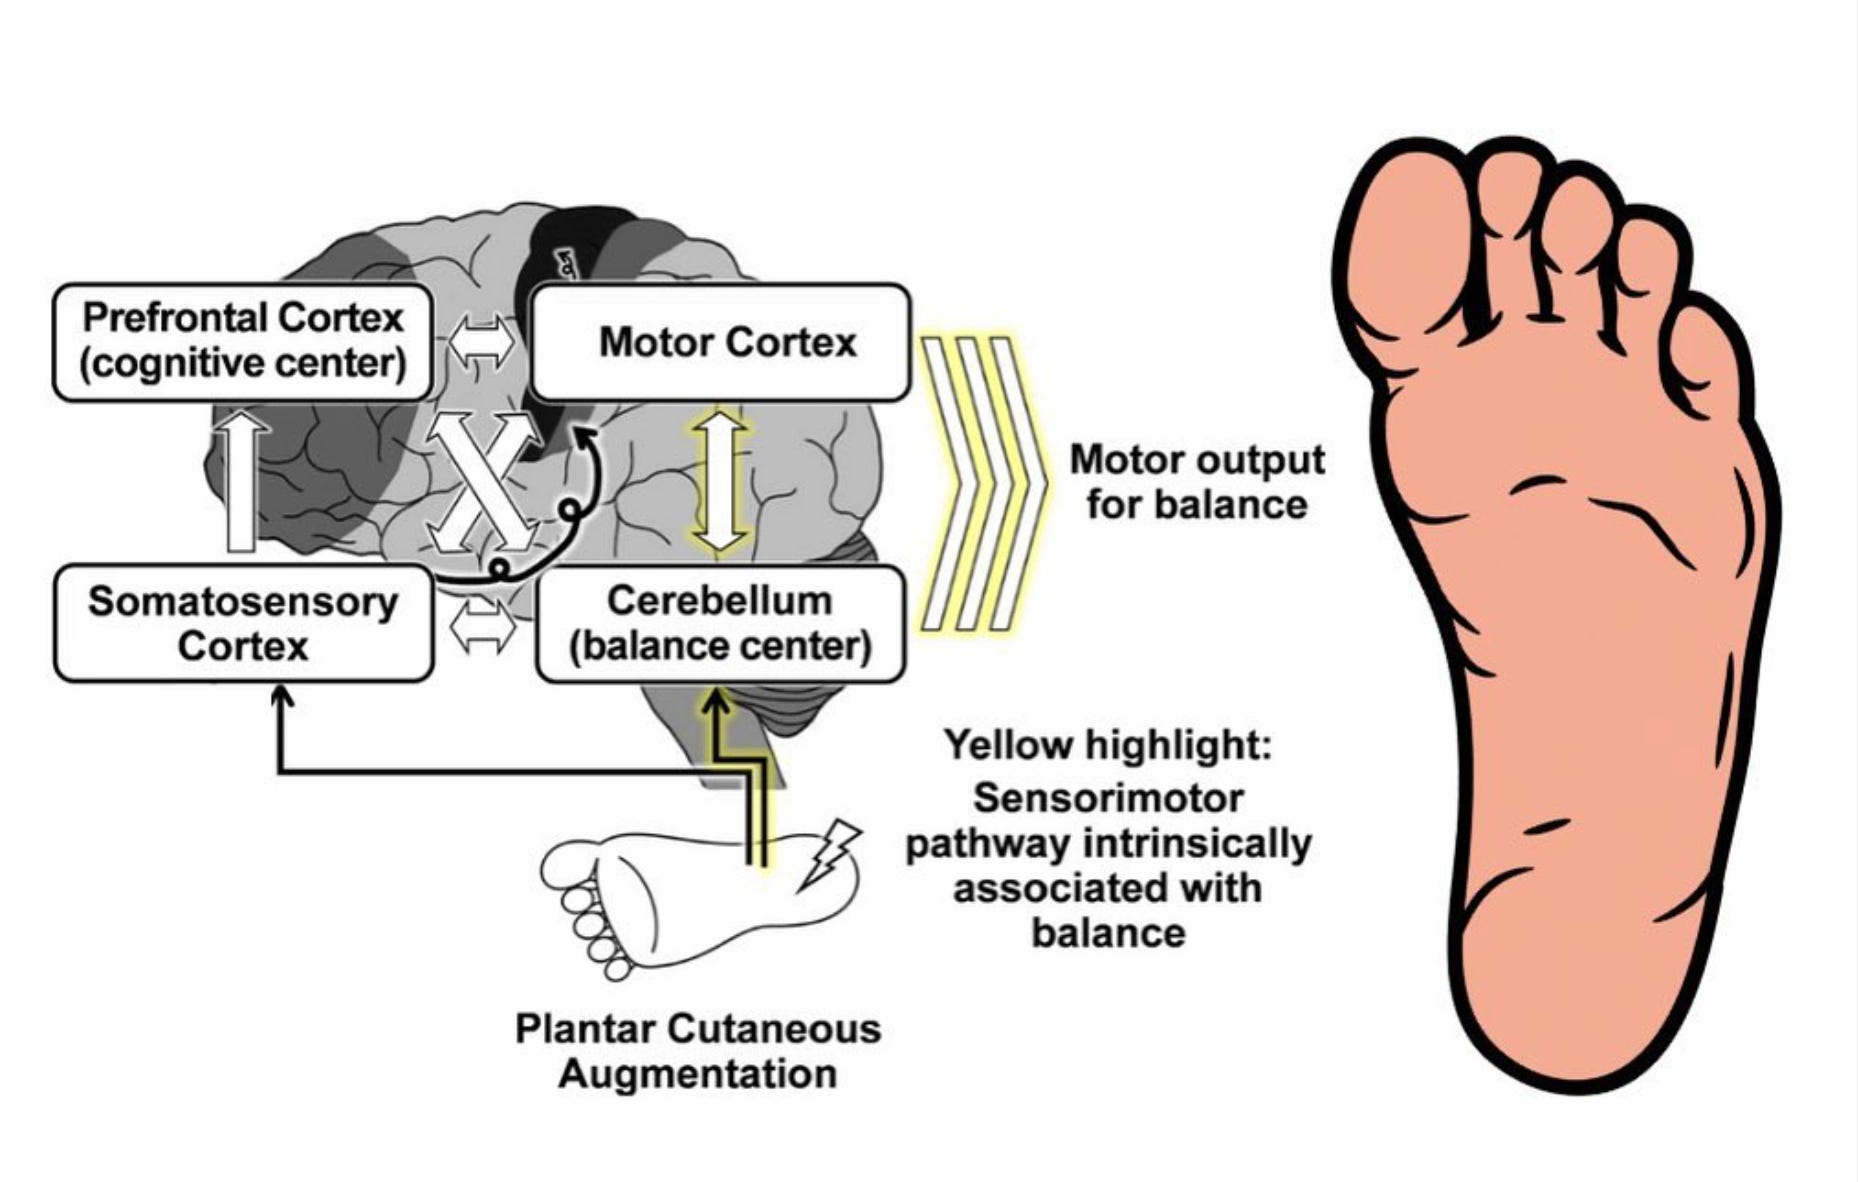
Your foot contains over 200,000 nerve endings—more sensory input per square inch than anywhere else on your body except your hands and face. These nerve endings are constantly sending signals through what scientists call the sensorimotor pathway (highlighted in yellow in the diagram).
Here's how it works:
Step 1: Sensory Input (Bottom of Foot) Every time your foot touches the ground, thousands of mechanoreceptors in your plantar surface (bottom of foot) detect:
Weight distribution
Ground texture
Balance shifts
Pressure changes
Step 2: Somatosensory Processing (Brain) These signals travel through your spinal cord to your Somatosensory Cortex—your brain's "feeling center." This region processes what your feet are experiencing and creates a mental map of your foot position.
Step 3: Cognitive Integration (Prefrontal Cortex) Your Prefrontal Cortex (cognitive center) receives this information and makes decisions about how to respond. It's constantly calculating: "Should I shift weight? Adjust arch height? Prepare for impact?"
Step 4: Motor Planning (Motor Cortex) Your Motor Cortex creates the movement plan, deciding which muscles to activate and how much force to use to maintain optimal arch position.
Step 5: Balance Coordination (Cerebellum) Your Cerebellum (balance center) fine-tunes these commands, ensuring smooth, coordinated muscle activation that maintains your arch throughout your gait cycle.
Step 6: Motor Output Finally, the refined motor commands travel back down to your foot muscles, telling them exactly how to contract to maintain proper arch support.
               Ready to go beyond exercises? The 5-minute Posture Fix you're about to
                   discover retrains your nervous system to maintain proper arch support
naturally no endless strengthening required.However, when exercises aren't enough (which is often the case for true structural flat feet), you'll need to retrains your nervous system's relationship with your feet. The most successful patients combine these strengthening exercises with Therapeutic Insoles that provide proprioceptive feedback, essentially teaching your body how to maintain proper arch position naturally.
Here’s what this reset changes:
1. Signals: You’re shifting how your system reads posture starting with how pressure hits the ground through your feet.
2. Muscles: Muscles stop compensating and start activating correctly. You’re not adding strength. You’re restoring the right tone at the right time.
3. Fascia: Connective tissue reorganizes around the new pattern. This is what makes changes stick, not snap back.
4. Brain: The nervous system updates its default setting — so standing tall feels normal, not forced.
Each drill you do is a signal to this loop.
And each day you repeat it, you’re teaching your system a new blueprint — one that doesn’t require effort to maintain.
💡 If you’re ready to go deeper, our full Course Pack which includes the Foot Mechanics and Gait Cycle which will give you the tools to understand and fix posture long term by addressing the body as a whole.
What You Need to Start Resetting
Primary Tool: Your Nervous System
Why? Because lasting change doesn’t come from force. It comes from resetting the system that tells your body how to hold itself.
Implementation Tool: A simple 5-minute routine
No equipment. No stretching. Just specific input designed to wake up the right pathways and rewire movement from the inside out.
Time Investment: 5 minutes a day
That’s all it takes to start changing how you move, feel, and stand without thinking about it.
Step 1 : Alternate Toe Lift

Instructions:
Stand steady with feet flat.
Raise big toe, press other toes down.
Switch: press big toe down, lift other four toes.
Alternate between these positions smoothly.
Keep your foot stable, moving only toes.
Complete 30 reps to boost posture.
Step 2: Wake Up Your Toes
Instructions:
Press pinky toe down steadily.
Position 1:
Keep the pinky toe on the floor as you lift the other 4 toes upwards.
Position 2:
Lower the 4 toes down into the floor.
Transition between these 2 positions.
Alternate positions smoothly, keeping foot steady.
Perform 30 repetitions.
Step 3: Strengthen the Arch Without “Arch Support”
Most people think they need arch support. But what they actually need is arch strength.
Here’s what to do instead:
Instructions:
Sit or stand
Try to gently “suction cup” your arch up off the ground without curling your toes
You should feel a slight contraction under the arch
Hold for 10 seconds, release, repeat x10
This one takes finesse not force. But over time, it re-trains the small intrinsic muscles that literally hold your structure together.
Step 4: Heel Raised
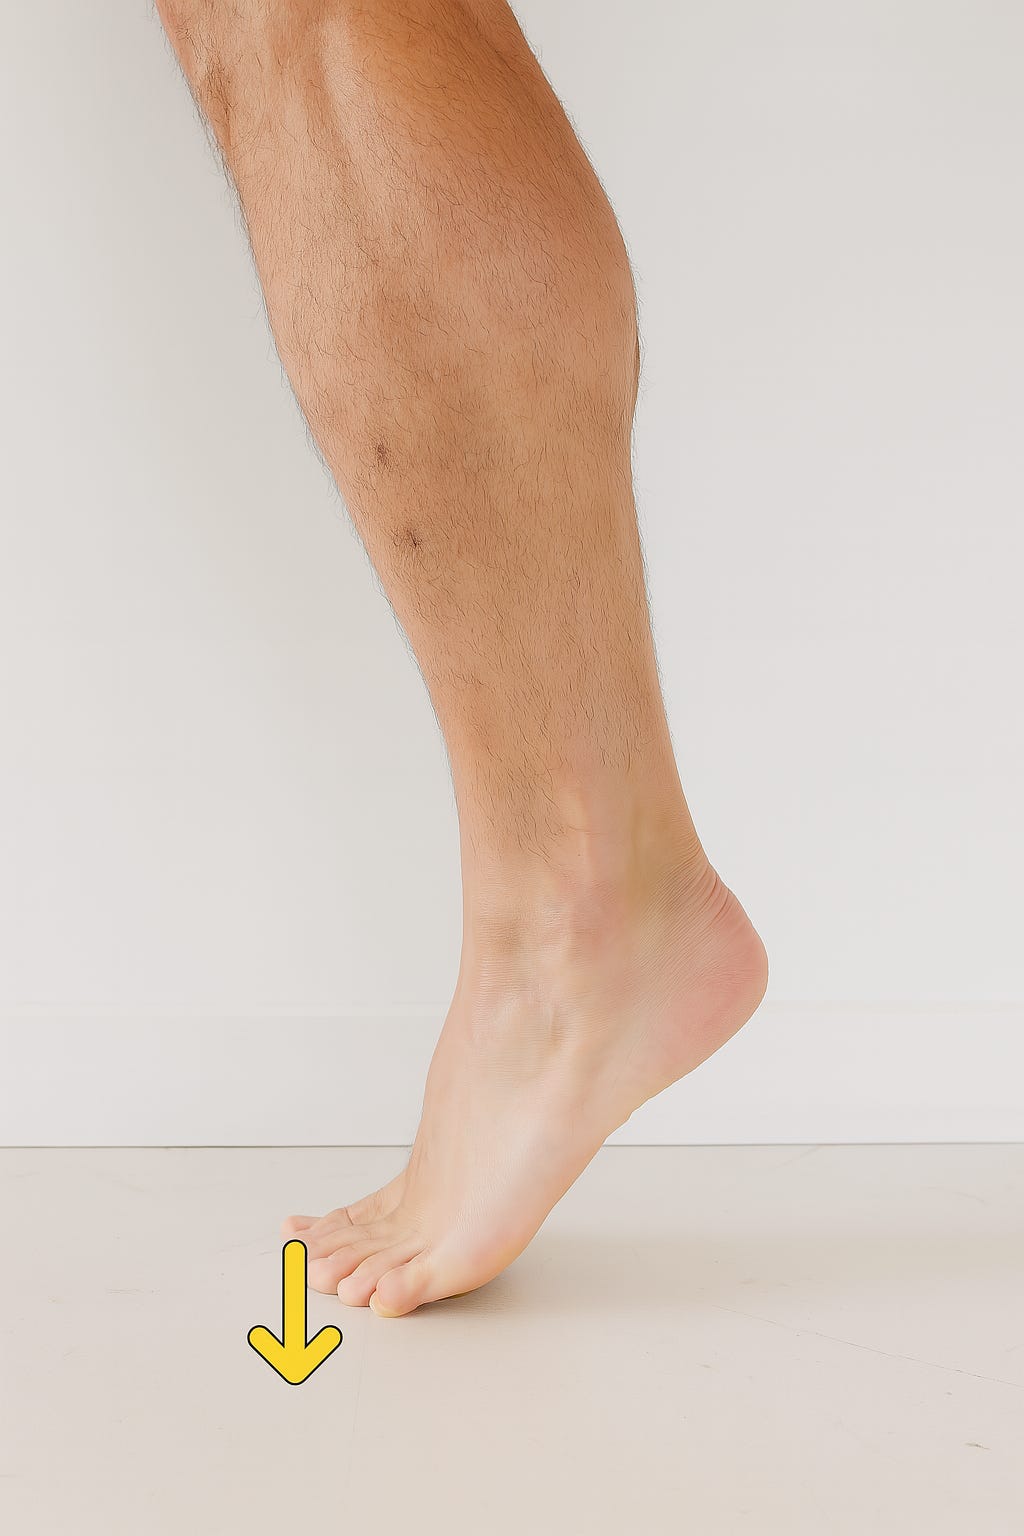
Instructions:
Position feet shoulder-width apart.
(Optional: grip a support for stability.)Lift heels off the ground.
Pause for 2 to 5 seconds.
Complete 20 reps.
Progression:
Do it on one leg.
Add handheld weights as needed. ![Image Description: A foot in a side view, standing on the ground with toes pointing forward. An upward arrow extends from the heel, indicating the lifting motion.]
Step 5 : Heel Raise with Ball
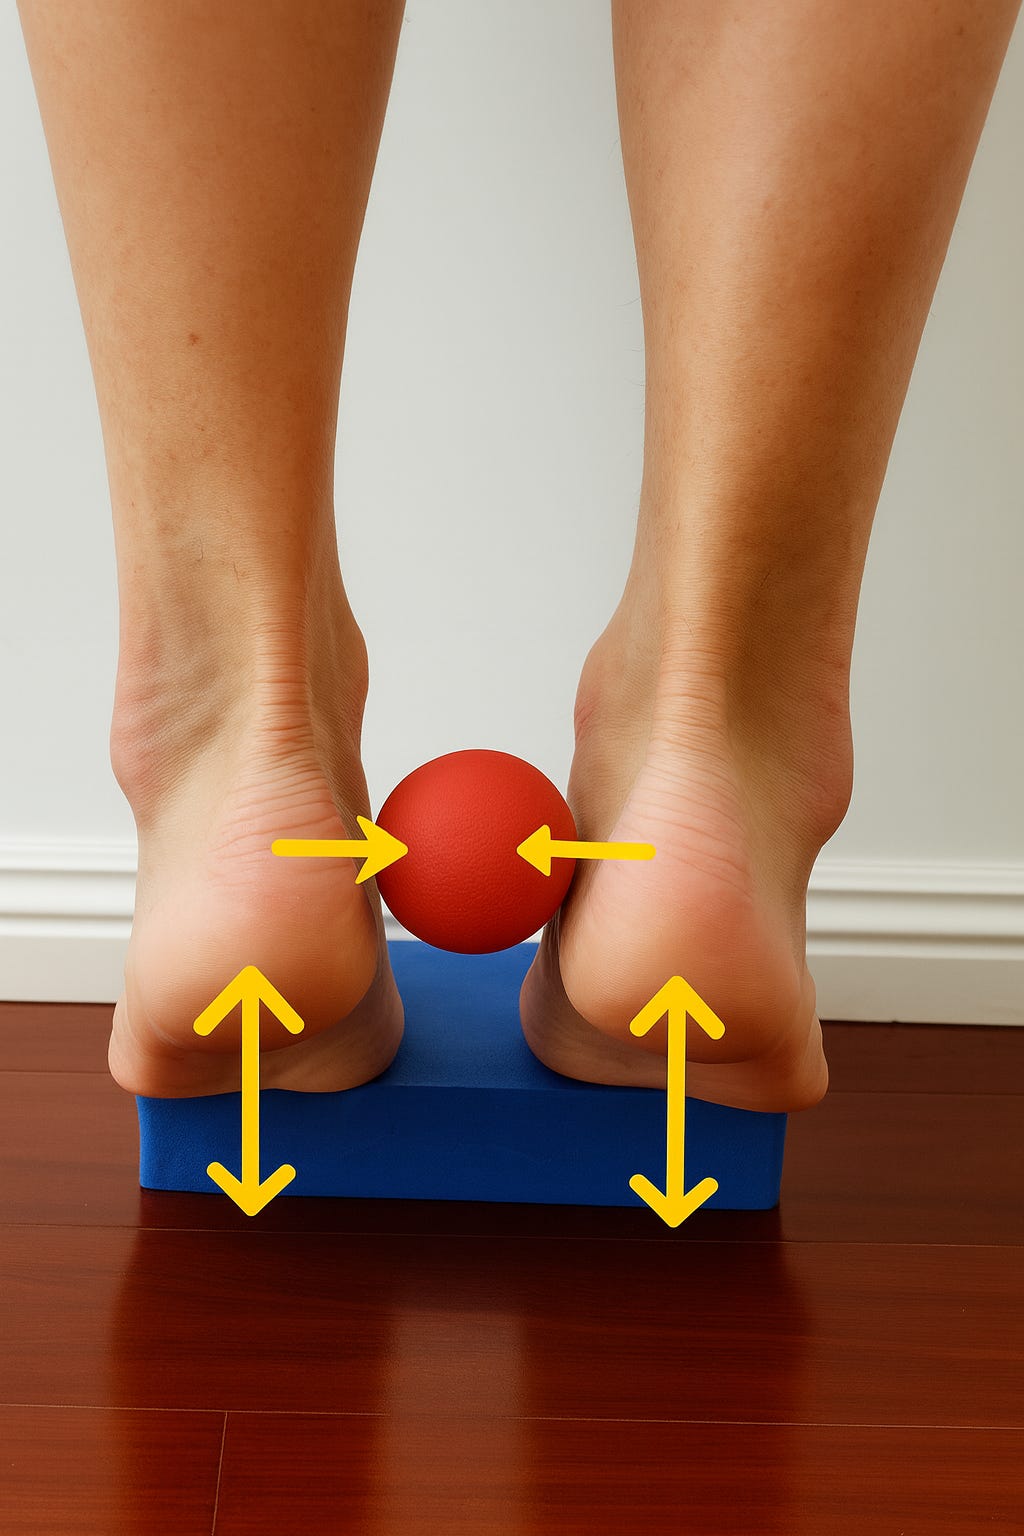
Instructions:
Position yourself on a step’s edge.
Place a small ball between both heels’ inner sides.
Press and lift the ball with your ankles.
Feel inner ankle muscles tighten.
Raise your heels high.
Hold for 2 to 5 seconds.
Complete 20 reps. !
Step 6: Build Ankle Strength with Controlled Instability

Sit in a chair.
Wrap a resistance band around your big toe’s base.
Grip the band’s other end with the same-side hand.
Tug the band outward to press against your knee.
Point your foot and toes straight ahead.
Arch your foot inward with steady force.
Feel the inner ankle muscles engage.
Hold for 2 to 5 seconds.
Repeat 20 times.Next Step: Add more pull to the band.
Step 7: Toe Push
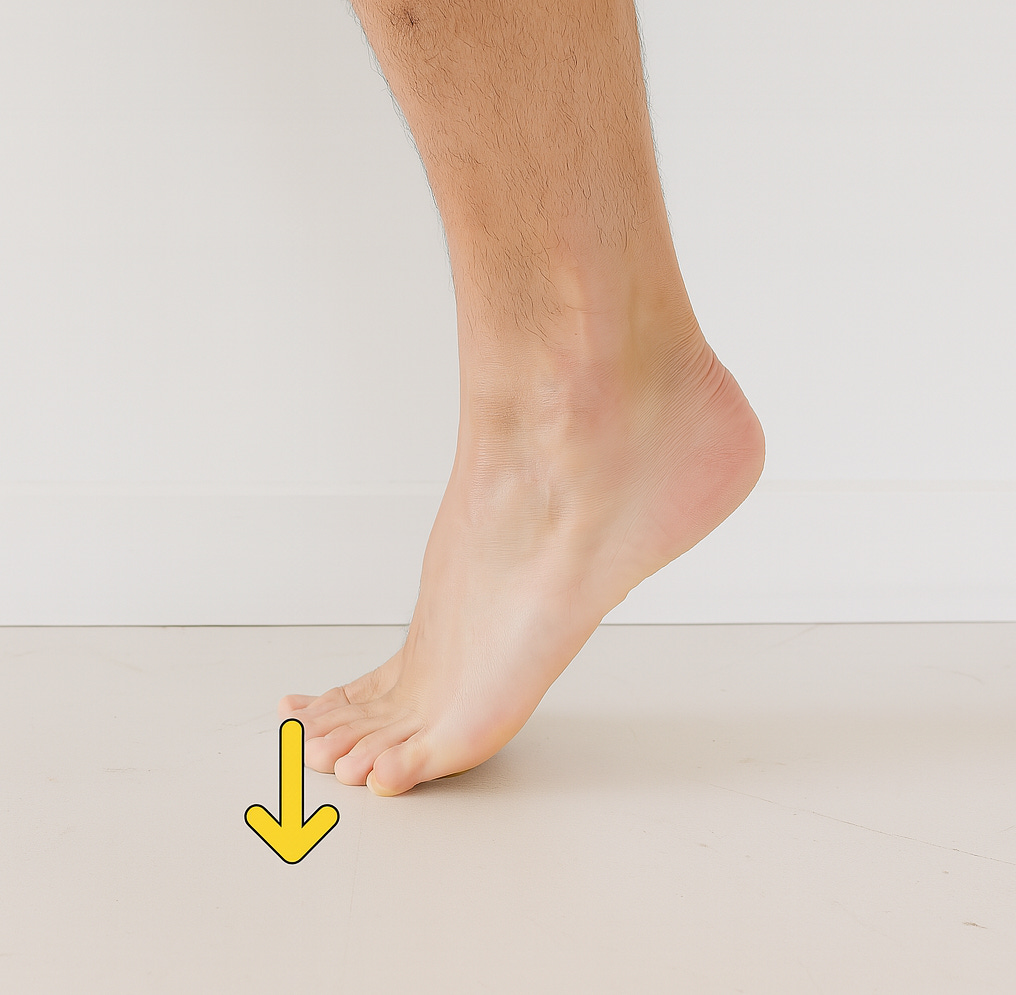
Instructions:
• Stretch toes to meet floor.
• Push toes hard into ground.
• Keeping pressure, lift onto toe tips.
• Hold for 5 seconds.
• Complete 20 reps.
• Next Step: Try in lunge position (back leg focus).
Conclusion
These exercises are an excellent starting point for anyone dealing with flat feet pain. They'll help strengthen your supporting muscles, improve stability, and provide some relief from daily discomfort. Many people see initial improvements within 2-3 weeks of consistent practice.
However, here's what most people discover after months of diligent exercise: the pain keeps coming back. Why? Because flat feet aren't just about weak muscles they're about faulty neurological patterns that keep telling your arches to collapse, no matter how strong your feet become. Ready to stop treating symptoms and start fixing the real issue?
What if you can't do thr isolation big to raise and other toe raise? What's a regression of this exercise?
What if you can lift big toe by pressing all other toes down but not the other way around? Can holding the big toe and then lifting the other four work?